Making this kind of animation without a trajectory can in principle be devided into 3 parts:
In this tutorial I will use a small, but well known, enzyme called Lysozyme. Download lysozyme with pdb entry 1FSJ from The Protein Data Bank and load it in pymol. Alternatively, you can download it directly from pyMol with the fetch command. Then prepare the file so that it has no pdb header or any water molecules/ions (we do not need these). Open pymol and type in the command field:
PyMol> fetch 1FSJ
or if you downloaded the file:PyMol> load 1fsj.pdb
PyMol> save lysozyme.pdb, 1fsj and not (resn HOH or resn NO3)
PyMol> delete 1fsj
PyMol> load lysozyme.pdb
The first thing to do is deciding how to represent the protein. This will totally depend on what
your preferences are and what you think looks the best. A good start is therefore to play around
with your structure in pymol (you can get some tips from pyMol - the basics tutorial)
until you find a combination of colors etc. that you are happy with.
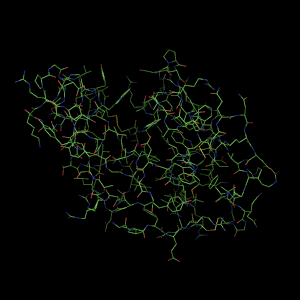
We want the Lysozyme to build up to look for example like this:

PyMol> set cartoon_color, gray, ss l
PyMol> set cartoon_color, yellow, ss s
PyMol> set cartoon_color, skyblue, ss h
PyMol> set cartoon_loop_radius, 0.5
PyMol> set cartoon_loop_cap, 2
PyMol> hide lines, all
PyMol> show cartoon, all
Now, what we really want to do is to display one residue at the time until the entire enzyme is visible. This will give the impression of a growing enzyme. Just to give you an idea on how this works, try to type the following:
PyMol> hide all
PyMol> show cartoon, lysozyme and i. 1-2
PyMol> show cartoon, lysozyme and i. 3
PyMol> show cartoon, lysozyme and i. 4
Let us start by making a script that can automatically displays the Lysozyme as above, but without typing all those commands everytime you start a new pyMol session. Open a text editor like textedit, gedit or notepad for example and type the following:
from pymol import *
cmd.set('cartoon_color','skyblue','ss h')
cmd.set('cartoon_color','yellow','ss s')
cmd.set('cartoon_color','gray','ss l')
cmd.set('cartoon_loop_radius','0.5')
cmd.set('cartoon_loop_cap','2')
cmd.hide('lines','all')
cmd.show('cartoon','all')
PyMol> reinitialize
PyMol> load lysozyme.pdb
PyMol> run settings.py
The next step is to write some code that can display one reisdue at the time and save a snapshot of it until the entire enzyme is visible. Lysozyme consists of 130 residues, so we are going to create 130 images. All we need to do here is to write a loop that cycles 130 time. The quasi code for this would look something like (this is not the actual code, just a more readable scetch):
for residue in range 1 to 130:
display residue
save image
Write the following script and save it as 'createImages.py':
from pymol import *
cmd.set('cartoon_color','skyblue','ss h')
cmd.set('cartoon_color','yellow','ss s')
cmd.set('cartoon_color','gray','ss l')
cmd.set('cartoon_loop_radius','0.5')
cmd.set('cartoon_loop_cap','2')
cmd.hide('lines','all')
img=0
def fileName(n):
if n < 10:
image='000'+str(n)
elif n < 100 and n > 9:
image ='00'+str(n)
elif n > 99 and n < 1000:
image = '0'+str(n)
elif n > 999:
image = str(n)
return image
for i in range (1,131):
newRes=int(i)
img = img + 1
image = fileName(img)
cmd.show('cartoon','i. %i' %newRes)
cmd.ray('400','400')
cmd.png(image)
print 'Image %i written' % img
In pyMol, write the following commands to run the script and generate the images:
PyMol> reinitialize
PyMol> load lysozyme.pdb
PyMol> run createImages.py
If you decide to use ImageMagick to create a gif animation, open a terminal window and type the following code in the directory where your image series is located:
convert -set delay 3 -loop 0 -scale 100% *.png Output.gif

Happy modeling!